
A Guide To Our S-Log Workflow
+ The Custom S-Log LUTS we’ve been using
Over the last year we’ve been getting a lot of questions about our color grading workflow, specifically how we deal with S-log2 and S-log3 footage. We've been shooting S-Log since 2016 and one of the questions we frequently get asked is:
"How do you edit your Sony S-Log footage?"
Well, we're taking you through our S-log2 and S-Log3 workflows including our camera settings, shooting tips, LUTs we use, and setting up your files in post.
Watch the Video
Read The Post
What is Log?
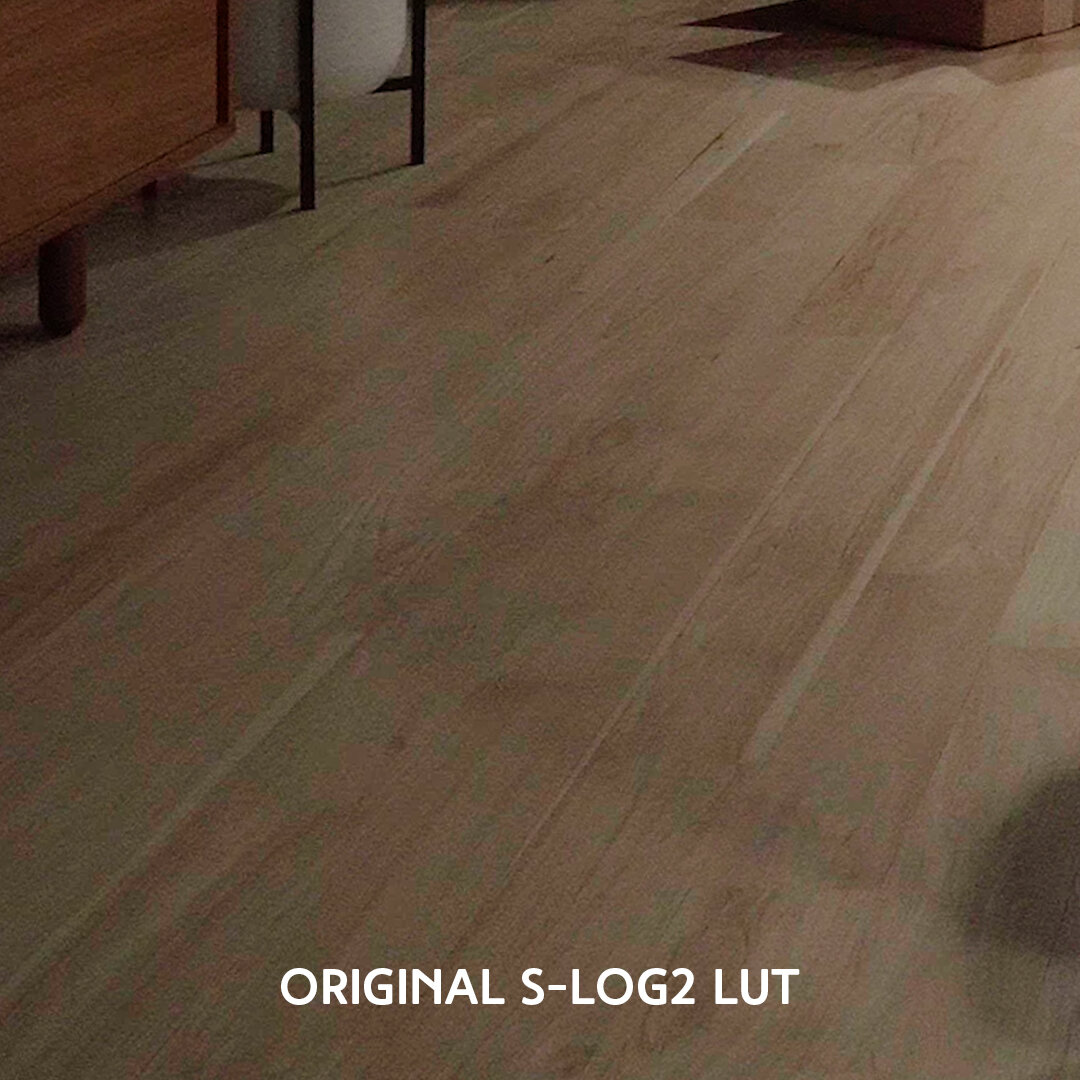
Without getting too technical, log footage refers to the way the camera records the scene in order to capture as much dynamic rage as possible, which is desirable because wide dynamic range is one of the many subtle visual cues we've associated with looking cinematic. Unedited log footage will therefore be really low in contrast and saturation in order to preserve that wide a range of data.

A7S3 | S-log3 out of camera
Then in post, we can add back in contrast and saturation. This adjustment should be standardized and predictable - it should be a simple easy step to get your log footage looking more "normal" so you can then start grading or stylizing your image.

A7S3 | BC S-log3 for Sony A7S3 LUT applied
And this is where LUTs or "look up tables" come in to play. They're basically a standard set of instructions or filter if you will, that can take care of this conversion within your editing software. And this is where there's a lot of confusion:
How do I get these LUTs?
Do I make them? Do I buy them?
Which one should I use?
In 2016 when we started shooting log on our A7S2, we had all those same questions and ultimately ended up developing our own, and we've since developed a couple more. Bottom line is, any footage you see on our YouTube channel was shot in S-Log and was run through one of our custom LUTs.
S-log2 or S-log3?
What LUT you use depends on what camera and settings you're using. In the Sony landscape, they give you two log options: S-Log2 and S-Log3. Generally speaking, S-Log2 is better suited for most of their consumer 8 bit cameras such as the a6000 series, a73, a7r4, etc.
If you're using a camera that can record in 10 bits or has a higher dynamic range, such at the new A7S3, S-Log3 is a better choice. If you want more info on this, way nerdier people have done videos on it, aka Gerald Undone.
So we have cameras that fall in both of those categories, so we have developed LUTs for both S-Log2 and S-Log3.
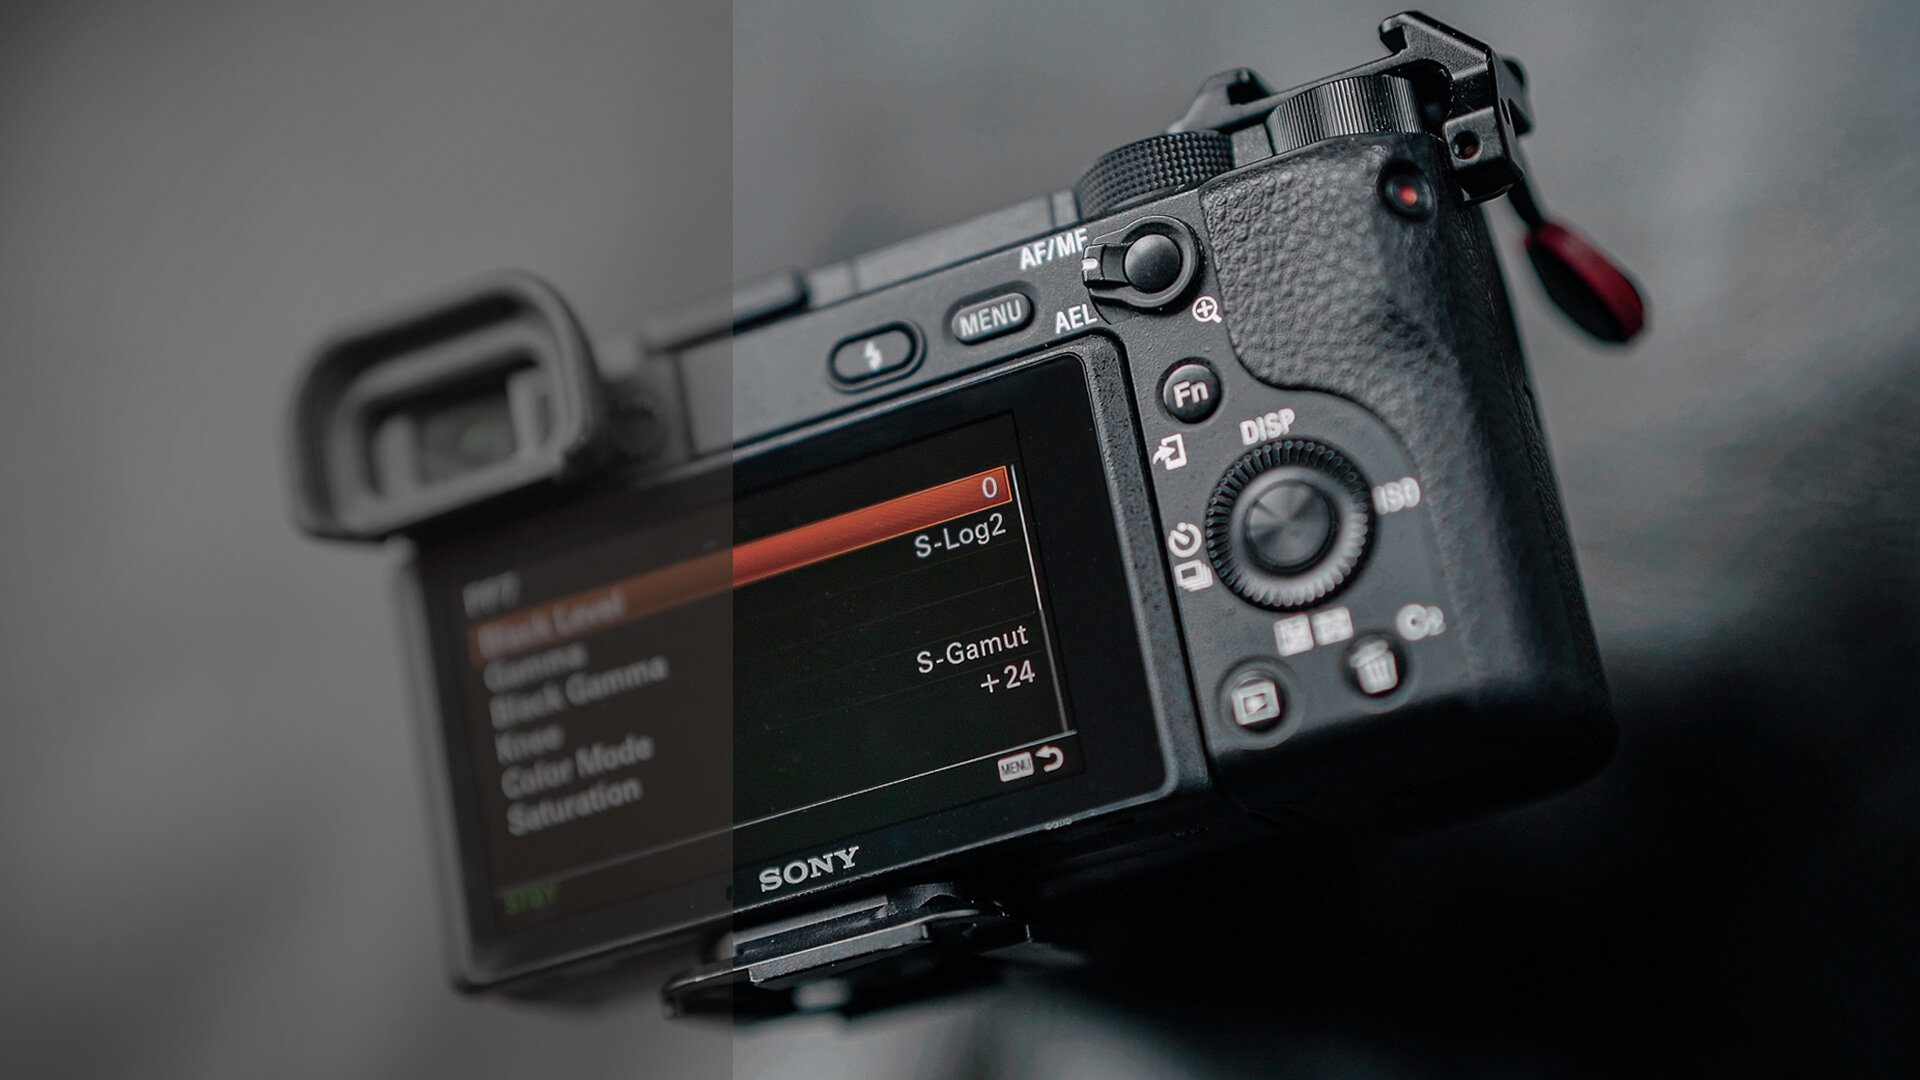
S-log 2 using 8 bit consumer cameras
If you're using any Sony consumer camera that isn't the A7S3, then you should probably choose S-Log2 which will work with one of our two S-Log2 LUTs.
Set-Up
Change your picture profile.
01
Go into your menus, find the picture profile section and choose PP7. This should automatically set the gamma to S-Log2, the color mode to S-Gamut, and saturation to 0. The only thing we choose to change in the profile is the detail level from the default -7 to 0. A lot of people would rather add sharpening back in post, but I find leaving it at 0 looks fine and quite frankly does a better job than I can do in post. Either way, this has nothing to do with shooting in log, but it's a setting you should be aware of.
02
One other setting we use is the gamma assist function. We leave this on auto which will basically normalize how the footage looks on the back of your camera but will not affect the log footage being recorded. This will help you gauge the exposure and lighting of your shot which can be kinda hard to do with a really low contrast log image.
03
I also set my zebras to the clip point of whatever profile you're using so 106 for S-Log2. That will tell me what is definitely clipped, but I don't gauge my exposure by the zebras I more so just use the meter and eyeball it. I also stopped relying on my histogram, which was hard because as a photographer, that was my gold standard, but I find in log modes, your image can be very over exposed but the histogram can be deceivingly central making you think you have a properly exposed image.
If you shoot with these settings, our free Original S-log2 utility LUT will work for you.
*This item is not for resale
**Please read all instructions before downloading
Note: Link will expire in 24h, please download files right away and save them in a safe spot.
Guide to our S-log workflow:
https://www.beckiandchris.com/blog/a-guide-to-our-s-log-workflow
Each LUT has been exported at a variety of sizes. Using a larger size LUT (e.g. 64) will provide the most accurate color transformation but may be more taxing on your computer.
Smaller size LUTs (e.g. 8) will provide a less accurate color transformation. The quality of your image will not be affected, but rather the color and contrast adjustment may be off, particularly in the shadows and highlights.
Start by applying the largest size LUT to your footage and if your computer drops frames when trying to playback the footage, try a smaller size LUT. In our experience, sizes 16 and below usually have noticeable inaccuracies. Sizes 25 and greater usually are fairly accurate.
Make sure you setup your picture profile in your camera properly or LUT will not work properly: https://youtu.be/0EqbVw4N5qc
Exposure
Once your camera is setup, you need to consider how to expose your image. There's a lot of people who have done deep dives into why but generally you should try to expose your image about 2 stops OVER what your meter is telling you. This is to keep your shadows clean and as noise free as possible. If you want to get fancy, you can get an 18% gray card and spot meter it and adjust the exposure that way but I find the camera's "multi metering mode" actually does a pretty good job assessing most scenes. Also, you get pretty good at knowing what looks correct after you shoot log for a while. Just remember that +2.0 is the highest the meter will read so if you're actually at +5, ti will just blink +2.0 which can be confusing so aiming for 1.7 is usually a safer bet and of course it if you're plus 1.3 vs plus 2.0, it's not going to be make that much of a difference.
Editing
We use Adobe Premiere Pro to edit but most software should have a way to apply a LUT file. In Premiere I usually will create two adjustment layers, one for my log to rec. 709 LUT and any primary color correction and then a second adjustment layer for my grade, which can be applied to usually the whole edit. Using Lumetri color panel, I'll apply our Original S-Log2 LUT in the creative tab rather than the basic corrections section. And that's because any adjustments I make in the basic corrections panel above it will happen BEFORE the LUT is applied. So if I have a super high dynamic range scene and the LUT completely obliterates the shadows or highlights, I can make adjustments in the basic panel that can save this information. Once you have your LUT applied, you can do your primary color correction by fine tuning your exposure and white balance and really get the clip to a neutral starting point for your color grade
8 bit s-log2 color noise fix
One of the major issues with shooting with consumer 8 bit cameras and using log footage is that there are side effects when making massive color adjustments in post, and what i mean by that is it can bring out artifacts. With Sony in particular, blocky green and magenta color noise in the shadows can be a big issue. But we have a fix for this, and hats off to Dunna Did It for this idea.
So we mentioned earlier that log footage records images with low contrast and low saturation and that you add both back in in post. Since the goal of shooting in log is to maximize dynamic range, most of the benefit comes from the contrast, not the color. If we can record the color saturation as close to normal as possible and do a less aggressive color adjustment in post, that should fix the problem.
I did a bunch of tests and figured out what I thought the best settings were in camera and then developed a new custom LUT, and I can get an image that is virtually identical to our original S-log2 LUT but without the color blocking.

if you're interested in this LUT, You can purchase it below
*This item is not for resale
**Please read all instructions before downloading
Note: Link will expire in 24h, please download files right away and save them in a safe spot.
Guide to our S-log workflow:
https://www.beckiandchris.com/blog/a-guide-to-our-s-log-workflow
Each LUT has been exported at a variety of sizes. Using a larger size LUT (e.g. 64) will provide the most accurate color transformation but may be more taxing on your computer.
Smaller size LUTs (e.g. 8) will provide a less accurate color transformation. The quality of your image will not be affected, but rather the color and contrast adjustment may be off, particularly in the shadows and highlights.
Start by applying the largest size LUT to your footage and if your computer drops frames when trying to playback the footage, try a smaller size LUT. In our experience, sizes 16 and below usually have noticeable inaccuracies. Sizes 25 and greater usually are fairly accurate.
Make sure you setup your picture profile in your camera properly or LUT will not work properly: https://youtu.be/0EqbVw4N5qc
Set-Up
01
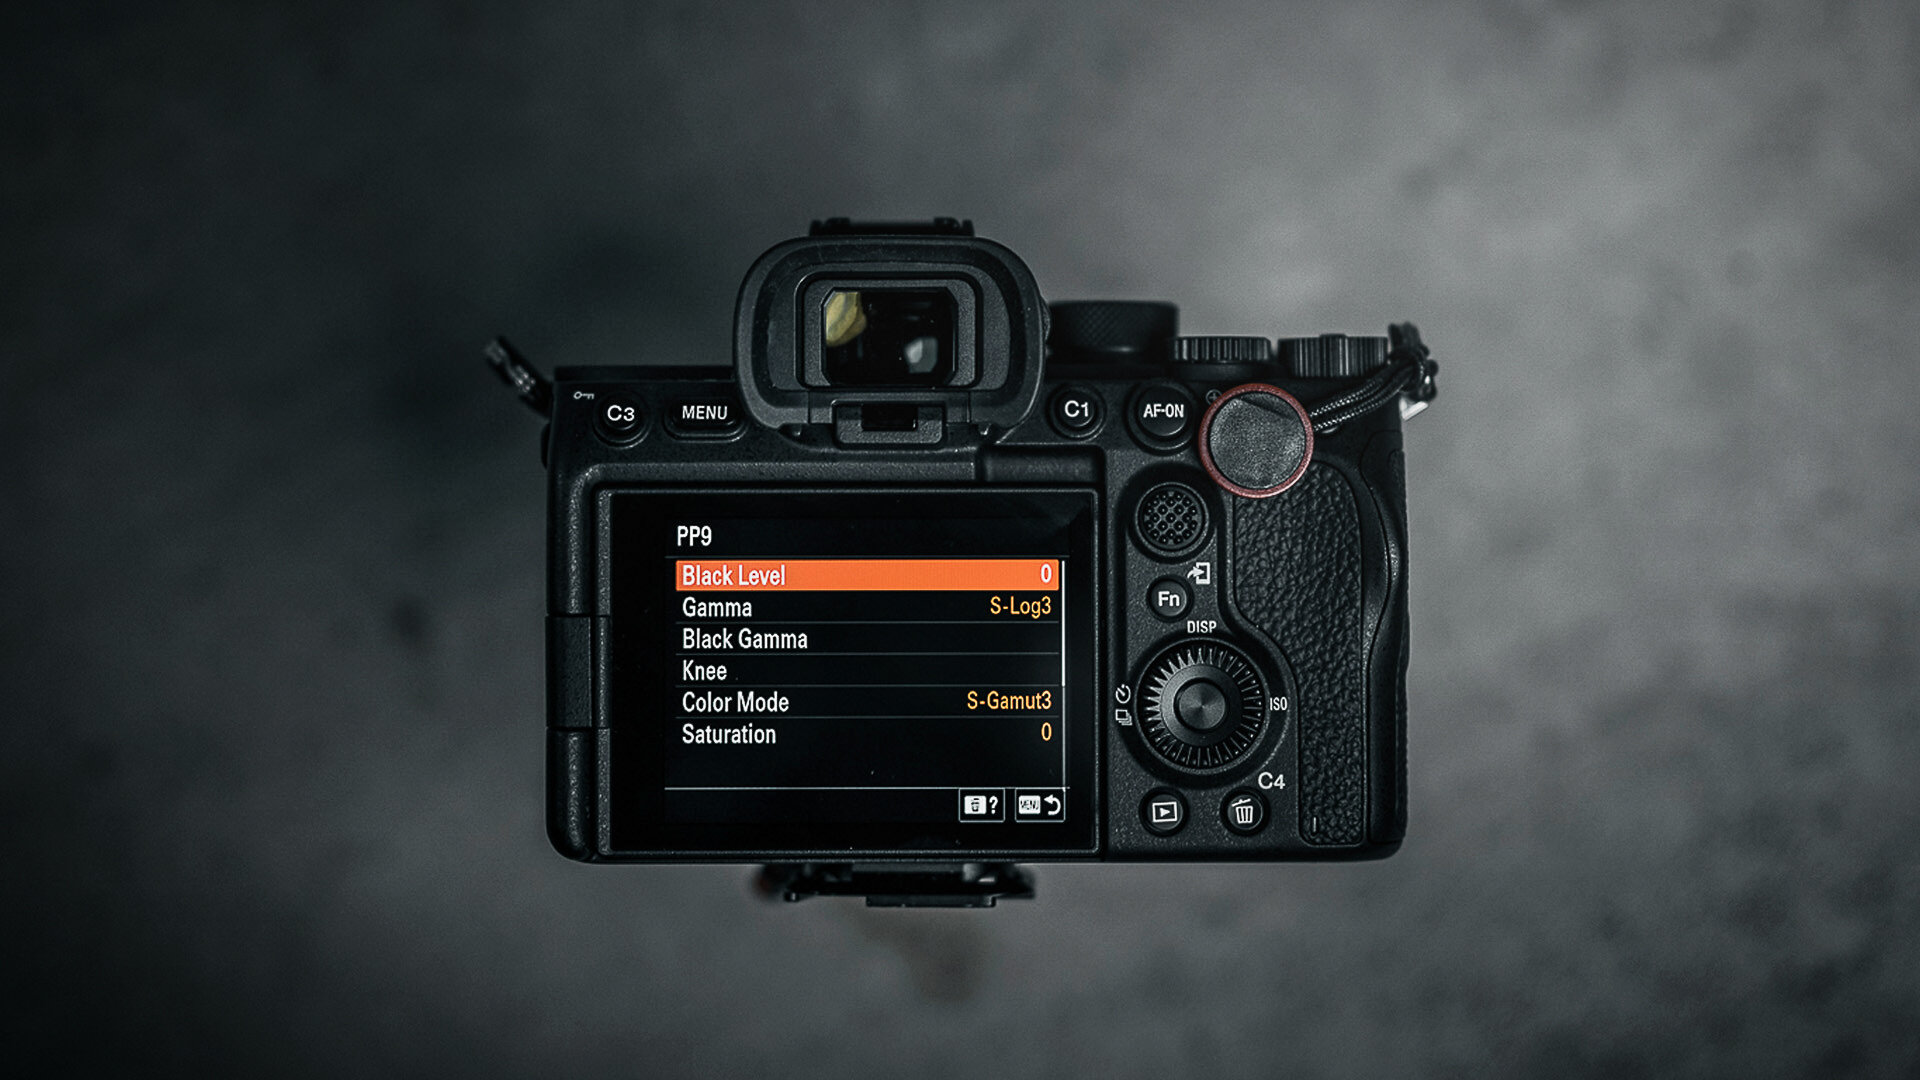
To use it, you'll first need to set your camera up. Again, we're using the a6400 here as an example but most other Sony cameras will have similar if not identical menus. Find the picture profile menu and choose PP7. This should by default have the gamma set to S-Log2, the color mode to S-Gamut, and saturation to 0. Change the saturation to +24. I tested a bunch of different saturation levels and found +24 to require the least aggressive adjustments in post, hence why I chose it. And as mentioned before, we also change the detail level from -7 to 0 as we find the in camera sharpening does a decent job and saves us from having to sharpen in post.
02
We also recommend setting the gamma assist function to auto which will attempt to normalize how the preview looks on the back of your camera without affecting the contrast of the log footage being recorded. Note that the colors will look hyper saturated on the back of your camera since we jacked the saturation in the picture profile.
Exposure
As we explained in a bit more detail in the video at the beginning of this post, you'll want to aim for exposing 2 stops over what your meter is telling you. We use the default "multi metering mode" and find it does a pretty good job in most cases. I custom set zebras to lower limit 106 so I know what's clipped, but I don't use them to gauge my exposure.
Editing
I'll refer you guys again to the video on how we set up our timeline but in a nut shell we create one adjustment layer for primary color correction, apply the LUT in the creative tab, and use a second adjustment layer above it for grading/stylizing.
s-log 3 cameras - a7s3
If you're using a camera like the new Sony A7S3 that's better suited for S-Log3, we've developed our custom S-log3 for A7S3 LUT. We created this to match our other Sony cameras shooting S-Log2 so regardless of which camera we are using and whether it's shooting in S-Log 2 or 3 with or without the saturation fix, all of our angles will match as seamlessly as possible.
*This item is not for resale
**Please read all instructions before downloading
Note: Link will expire in 24h, please download files right away and save them in a safe spot.
Guide to our S-log workflow:
https://www.beckiandchris.com/blog/a-guide-to-our-s-log-workflow
Each LUT has been exported at a variety of sizes. Using a larger size LUT (e.g. 64) will provide the most accurate color transformation but may be more taxing on your computer.
Smaller size LUTs (e.g. 8) will provide a less accurate color transformation. The quality of your image will not be affected, but rather the color and contrast adjustment may be off, particularly in the shadows and highlights.
Start by applying the largest size LUT to your footage and if your computer drops frames when trying to playback the footage, try a smaller size LUT. In our experience, sizes 16 and below usually have noticeable inaccuracies. Sizes 25 and greater usually are fairly accurate.
Make sure you setup your picture profile in your camera properly or LUT will not work properly: https://youtu.be/0EqbVw4N5qc
FAQ
Does this LUT work with A74 Files?
Yes! We’ve recently tested this LUT on 10 bit S-log3 files from the A74 and it works great. When compared side by side to the A7S3 the files match great!
Does this LUT work on non Sony video files?
We cannot guarantee this LUT will work correctly on files outside the Sony platform as we have only tested them on Sony files.
Set-Up
01
The first thing you'll need to do is setup your camera. Find the picture profile menu and choose PP9. Make sure the gamma is set to S-Log3, the color mode is set to S-gamut3, and the saturation is set to 0. As we said in the last two sections, we prefer to set the detail to 0 instead of -7 as the camera does a decent job sharpening in our opinion, but this is of course up to personal preference.
02
We also make sure gamma assist is set set to auto and custom set our zerbas to lower limit 94 to show us areas that are blown out.
EXposure
As with S-Log2, you'll want to overexpose what your meter is reading, generally between 1 and 2 stops. Gerald Undone did a massive video which covers this so I'll spare you guys the details, link is here.
Editing
In post, you'll then of course use our S-log3 for A7S3 LUT and apply it in whatever editor you use, in our case, Adobe Premiere Pro. Again, we talk about how we set up our timeline and adjustment layers in the video, but basically it's apply the LUT via the creative tab on the first adjustment layer, primary color correction can then be done in the basic correction tab of the same adjustment layer so it applies corrections BEFORE the LUT and then a second adjustment layer on top of the first can be used for your grade.
So that is it
With our custom utility LUTs we can get reliable log to Rec. 709 conversions and matching angles regardless of the camera we're using or if it's S-Log2 vs S-Log3. These are all the cameras we regularly use and you can see they all match pretty well.

Top left: Sony A7R4 (S-log2 SAT +24), bottom left: Sony A7S2 (S-log2 SAT 0), top right: Sony A6400 (S-log2 SAT 0), bottom right: Sony A7S3 (S-log3). All images here have very slight white balance adjustments + the final color grade added.
Each differs a little on the magenta/green axis but with a tiny white balance adjustment in post they're basically indistinguishable. I know a lot of you have been asking about our process so there it is. You can find all of these LUTs in the shop, including our free Original S-log2 LUT that we've legit been using in most of our videos since 2016.
SHOP Utility LUTS
https://www.beckiandchris.com/shop
*This item is not for resale
**Please read all instructions before downloading
Note: Link will expire in 24h, please download files right away and save them in a safe spot.
Guide to our S-log workflow:
https://www.beckiandchris.com/blog/a-guide-to-our-s-log-workflow
Each LUT has been exported at a variety of sizes. Using a larger size LUT (e.g. 64) will provide the most accurate color transformation but may be more taxing on your computer.
Smaller size LUTs (e.g. 8) will provide a less accurate color transformation. The quality of your image will not be affected, but rather the color and contrast adjustment may be off, particularly in the shadows and highlights.
Start by applying the largest size LUT to your footage and if your computer drops frames when trying to playback the footage, try a smaller size LUT. In our experience, sizes 16 and below usually have noticeable inaccuracies. Sizes 25 and greater usually are fairly accurate.
Make sure you setup your picture profile in your camera properly or LUT will not work properly: https://youtu.be/0EqbVw4N5qc
FAQ
Does this LUT work with A74 Files?
Yes! We’ve recently tested this LUT on 10 bit S-log3 files from the A74 and it works great. When compared side by side to the A7S3 the files match great!
Does this LUT work on non Sony video files?
We cannot guarantee this LUT will work correctly on files outside the Sony platform as we have only tested them on Sony files.
Includes all three of our Utility LUTS:
The BC Original S-log2 Utility LUT for Sony Cameras
BC Color Noise Fix S-Log2 to Rec. 709 Utility LUT for Sony Cameras
BC S-Log3 to Rec. 709 Utility LUT for Sony Cameras
Make sure you setup your picture profile in your camera properly or LUT will not work properly: https://youtu.be/0EqbVw4N5qc
*This item is not for resale
**Please read all instructions before downloading
Note: Link will expire in 24h, please download files right away and save them in a safe spot.
Pin This for Later

BECKI AND CHRIS
Instagram: https://www.instagram.com/beckiandchris
YouTube: https://www.youtube.com/c/beckiandchris
Twitter: https://twitter.com/beckiandchris